Want to know the secret behind truly breathtaking photos? Welcome to Photography Tip #2: Understanding the Exposure Triangle — the bedrock of all good photography. Whether you’re shooting with a DSLR, mirrorless camera, or even your smartphone in Pro mode, mastering this triangle will change the way you shoot forever.
What Is the Exposure Triangle?
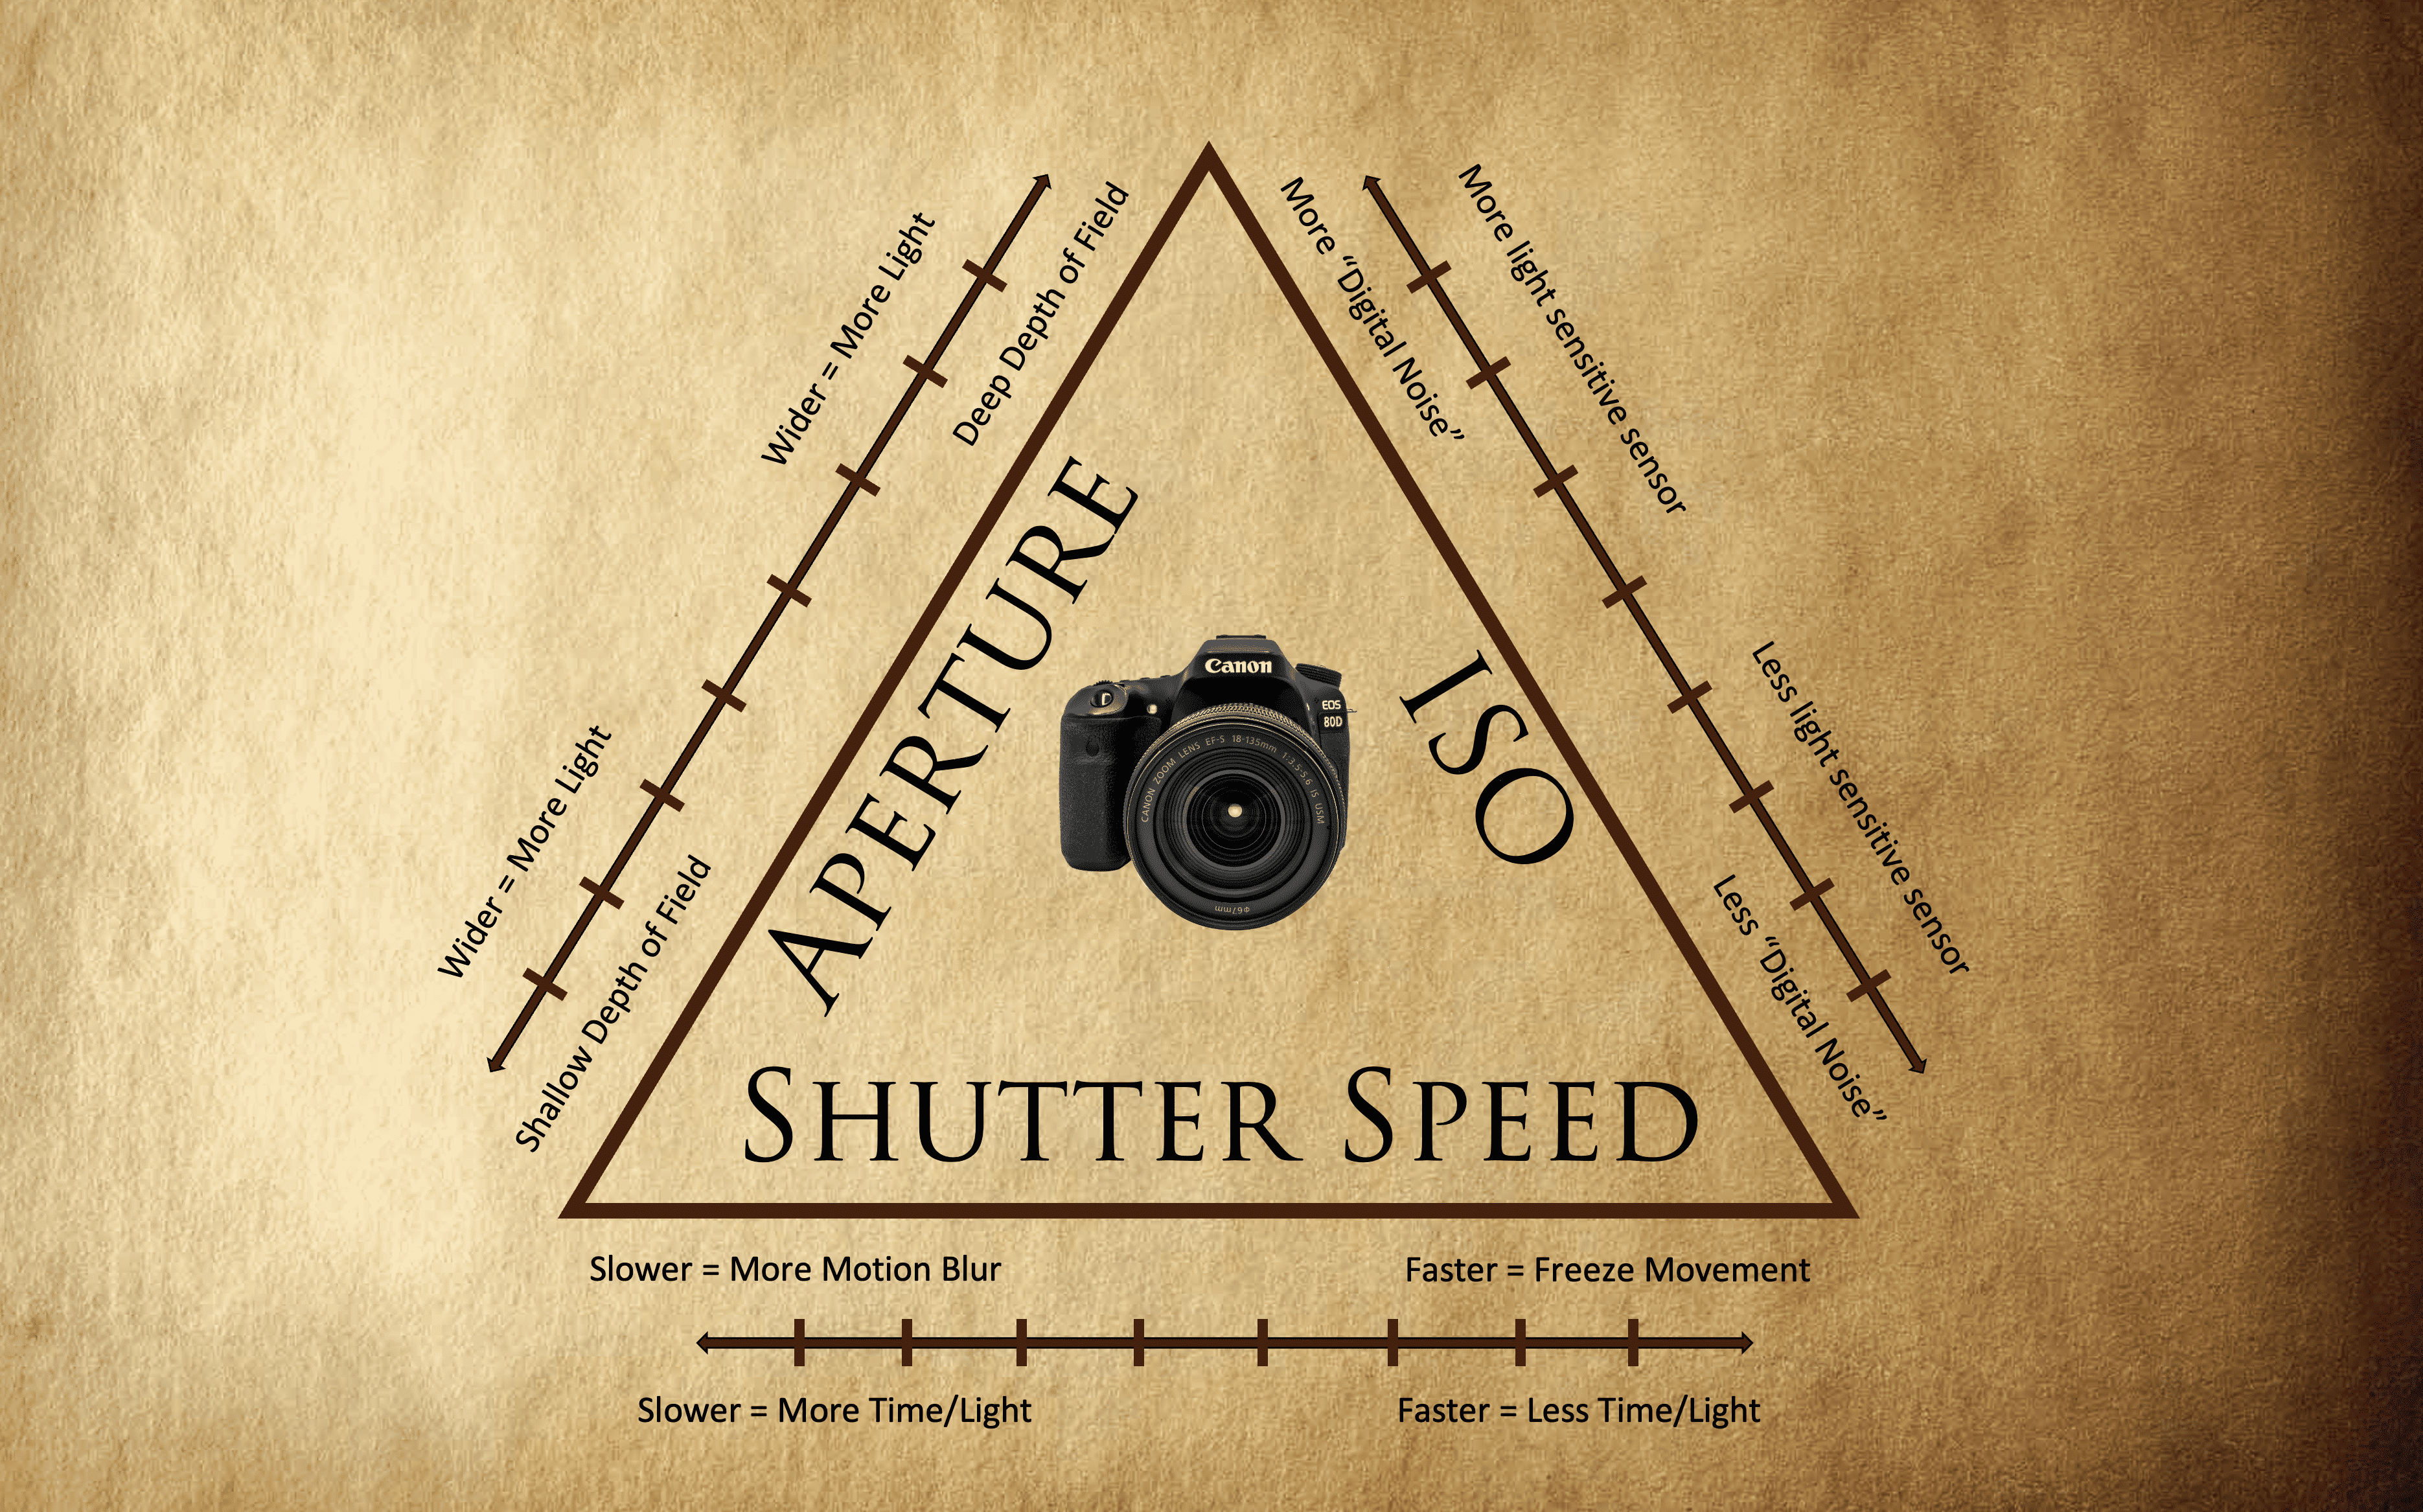
Imagine you’re cooking a perfect meal. You need the right balance of spices, heat, and cooking time. In photography, your “ingredients” are aperture, shutter speed, and ISO—the three settings that control exposure. Together, they form the Exposure Triangle.
Why Should You Care About the Exposure Triangle?
Because knowing how to balance these three controls is what separates amateurs from pros. Want a perfectly lit portrait? A creamy blurred background? A sharp nighttime skyline? The exposure triangle is the key.
The Three Pillars of Exposure
Let’s break it down—piece by piece.
Aperture: Controlling the Light Through the Lens
Think of aperture like the pupil of your eye—it opens and closes to let in more or less light.
How Aperture Affects Exposure
The wider the aperture (e.g., f/1.8), the more light enters. The smaller the aperture (e.g., f/16), the less light.
How Aperture Affects Depth of Field
This is where things get artistic. A wide aperture gives you that creamy background blur (bokeh), while a narrow one keeps everything in focus—perfect for landscapes.
Shutter Speed: Freezing or Blurring Motion
This controls how long your camera’s sensor is exposed to light. It’s like opening and closing a window.
How Shutter Speed Impacts Light
Fast shutter speed (e.g., 1/1000s) = less light.
Slow shutter speed (e.g., 1/10s) = more light.
Creative Uses of Shutter Speed
Want to freeze a bird mid-flight? Go fast.
Want silky smooth waterfalls? Slow it down.
ISO: Light Sensitivity of Your Sensor
ISO controls how sensitive your camera is to light.
Understanding ISO Settings
Low ISO (100–200) = crisp, noise-free images.
High ISO (1600–3200+) = brighter photos in dark settings—but at a cost.
The Trade-off: ISO vs. Image Quality
Higher ISO introduces grain or noise. So always aim to keep it as low as possible unless you absolutely need the light boost.
How the Triangle Works Together
Here’s where the magic happens.
Say you open your aperture to let in more light—great! But now your image is overexposed. You can balance it out by increasing shutter speed or lowering ISO.
Balancing Exposure: A Real-World Analogy
Think of filling a glass of water.
- Aperture is the size of the tap.
- Shutter speed is how long the tap is open.
- ISO is how thirsty the sponge at the bottom is.
To fill the glass just right, you need to juggle all three.
Exposure Triangle in Different Scenarios
Let’s apply it to real-life shoots.
Portrait Photography
Want a dreamy background? Use a wide aperture (f/1.8), adjust shutter speed for sharpness, and ISO for balance.
Sports & Action Shots
Use fast shutter speed (1/1000s or faster) to freeze action. You’ll need a wide aperture and possibly higher ISO to compensate.
Night Photography
Go for long shutter speeds (5s+), low ISO, and a tripod. Keep aperture around f/8–f/11 for clarity.
Common Mistakes Beginners Make
- Using Auto mode and never learning manual.
- Cranking up ISO unnecessarily.
- Forgetting that every change affects the whole triangle.
- Ignoring white balance and lighting.
Tips to Master the Exposure Triangle Faster
Let’s speed up your learning curve.
Practice with Manual Mode
It might feel clunky at first, but using Manual (M) mode forces you to learn the balance.
Use Histogram and Light Meter
Both tools help you avoid underexposure or blown-out highlights. Learn to read them—they’re your best friends.
Bonus: Tools to Help You Learn Exposure
- com – interactive exposure simulator
- Light Meter apps – to gauge light levels
- YouTube tutorials – visual learners, this is gold
Final Thoughts
Learning the exposure triangle is a game-changer. Once you understand how aperture, shutter speed, and ISO play together, you’re not just taking photos—you’re crafting art.
Don’t let this overwhelm you. It’s like riding a bike. Awkward at first, but soon it becomes second nature. So get out there, start experimenting, and make Photography Tip 2 your turning point in the world of Photography Tips.
FAQs
- What’s the best way to remember the exposure triangle?
Think of it like a triangle of balance—each corner affects the others. Practice is key! - Is manual mode necessary to learn the triangle?
Yes, it’s the fastest way to understand how each setting affects the others. - Does smartphone photography use the exposure triangle?
Absolutely—if your phone supports Pro or Manual mode, all three settings are there. - Why are my photos grainy even in daylight?
You’re probably using a high ISO. Keep it low in bright settings. - Can I use Auto mode and still get good results?
Sometimes, yes. But Auto won’t teach you creativity or control.
✅ Explore more powerful photography guides like this one at CameraTale.com — your ultimate source for hands-on camera tips and creative hacks.
For beginners and pros alike, CameraTale breaks down every concept with real-world examples and practical advice.


