Lighting is to portrait photography what seasoning is to cooking — it makes everything taste like itself. Whether you’re shooting a candid in the park or a studio headshot, how you place, shape, and balance light determines mood, texture, and even the story the photograph tells. In this guide for photographers, we’ll break down practical strategies and creative ideas so your portraits stop looking like snapshots and start looking like intentional art. Expect clear setups, simple word-diagrams, and actionable tips you can use right away. Portrait Photography becomes easier (and more fun) when you understand light. Ready? Let’s flip the switch.
Why Lighting Matters in Portrait Photography
Lighting isn’t just illumination — it’s information. It tells the viewer where to look, suggests the subject’s mood, and sculpts facial features. A soft, even light whispers intimacy; a hard single light can shout drama. For photographers, mastering light means controlling emotion and clarity in your portraits. That’s why the same model can read as gentle or edgy simply by changing the light angle or modifier.
The Science of Light: Intensity, Direction, Quality & Color
Understanding four building blocks — intensity, direction, quality, and color — gives you the vocabulary to design lighting intentionally. Intensity is brightness (and how it affects exposure). Direction is where light comes from (front, side, back, top or bottom) and it shapes shadows. Quality means hard (sharp shadows) versus soft (feathered shadows). Color refers to temperature — warm or cool — and it affects skin tones and mood. Learn to read these and you can translate ideas into setups.
Intensity — how bright is the light?
Intensity controls exposure and contrast. Brighter light increases contrast and can create specular highlights; lower intensity softens the scene and preserves more shadow detail.
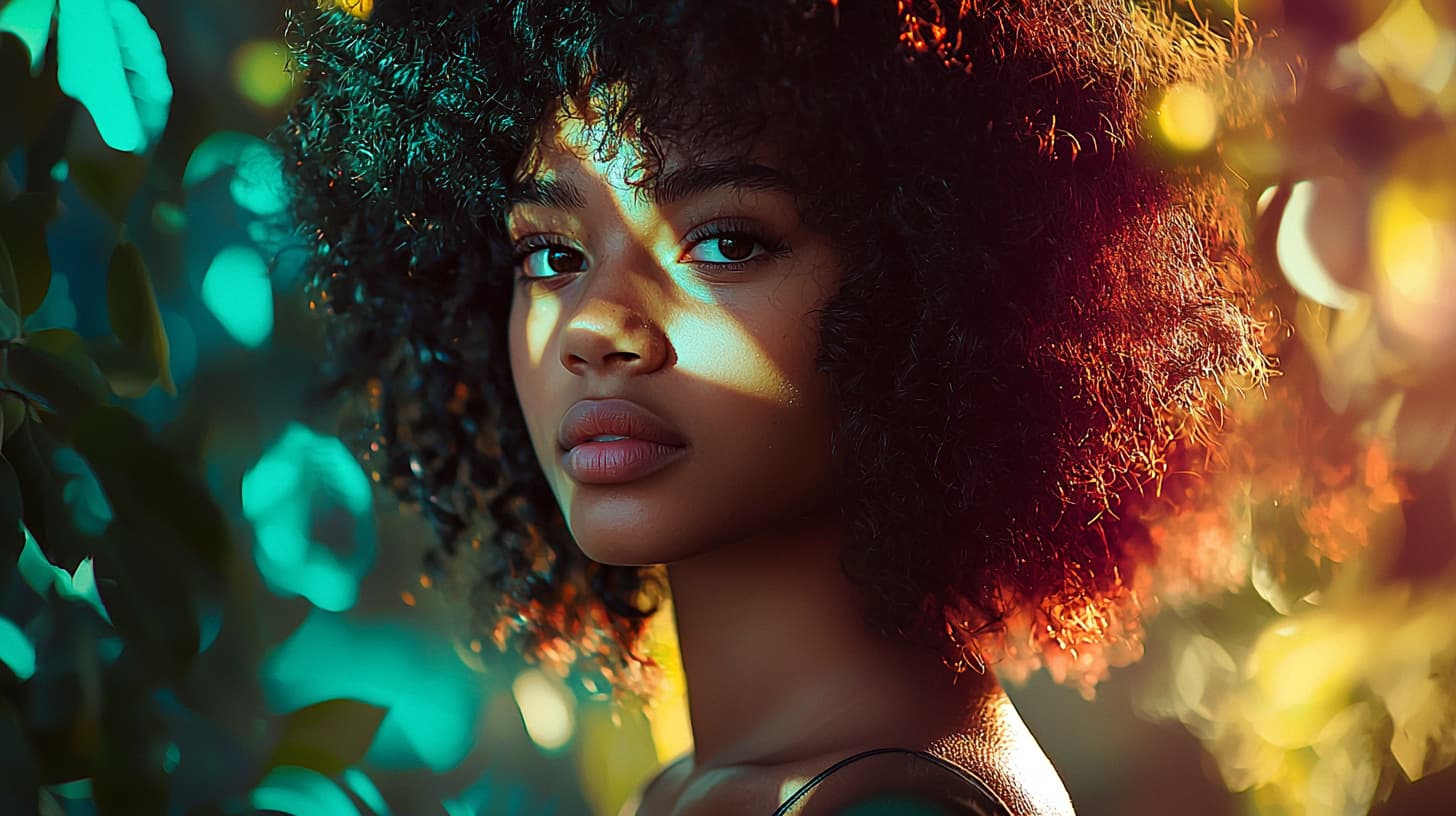
Direction — front, side, back, top, bottom
Direction sculpts facial planes. Side light emphasizes texture and shape; front light flattens; backlight produces rim glow.
Quality — hard vs soft light
Soft light wraps around forms (flattering for many portraits). Hard light casts crisp shadows and can be used for dramatic, high-contrast looks.
Color temperature and tint (Kelvin basics)
Use Kelvin to set white balance: lower values (3200K) are warm, higher values (5600K) are neutral daylight. Accurate color keeps skin tones natural and avoids unpleasant color casts.
Natural Light vs Artificial Light: Pros and Cons
Both have advantages. Natural light is free, beautiful, and dynamic; artificial light is consistent, controllable, and repeatable. Use natural light for organic, soft portraits (think window light or golden hour). Use artificial light when you need precision — headshots, product-style portraits, or mixed-light creative setups. Often the best work blends both: a soft window as key plus a small flash or reflector for fill.
Window Light Techniques
Window light is the portrait photographer’s secret weapon. Move your subject closer or farther to change intensity; use curtains as diffusers to soften the light; use a reflector opposite the window for gentle fill. Try backlighting through a sheer curtain for a glowing rim effect — it’s like putting your subject on a soft halo.
Backlighting Through Curtains (Practical Setup)
Place the subject between camera and window, but closer to the window than the camera. Expose for the subject’s face (use fill if necessary) to keep skin tones correct. The curtain will scatter the sun and wrap light around hair and shoulders — flattering and cinematic.
Golden Hour and Blue Hour
Golden hour (shortly after sunrise or before sunset) gives warm, low-angle light that flatters skin and produces long, pleasing shadows. Blue hour (just before sunrise or after sunset) gives cooler, moodier hues. Both are forecast-dependent — plan accordingly — but when you nail these windows, your portraits gain cinematic color and depth.
Key Lighting Setups for Portraits
There are classic setups that work every time — Rembrandt, Butterfly, Loop, and Split. These are not rules; they’re recipes. Understand them, then tweak to taste.
Rembrandt Lighting
Named after the painter, this style creates a small triangle of light under the subject’s eye on the shadow side of the face. Position your main light slightly above and 45° from the subject. The look is dramatic yet natural and works well for three-quarter profiles.
Butterfly (Paramount) Lighting
Place the light high and centered above the camera, casting a small shadow under the nose that resembles a butterfly. This is glamorous — think classic Hollywood headshots — and it flatters cheekbones and jawlines. Use a reflector below the subject’s chin to reduce harsh shadows.
Loop Lighting
The most versatile: position the light slightly above and to one side so it casts a small shadow of the nose onto the cheek. It sculpts the face without being dramatic — a great go-to for many skin types and face shapes.
Split Lighting
Half the face lit, half in shadow. Position the light 90° to the subject’s side. Use this for moody, intense portraits; it emphasizes texture and creates a strong, cinematic punch.
Modifiers & Tools: Softboxes, Reflectors, Grids, Snoots
The right modifier shapes light quality. Softboxes and umbrellas make light wrap and soften skin; grids and snoots concentrate light for dramatic highlights; reflectors bounce fill into shadowed areas. Choosing and placing modifiers is a balance between softness, control, and the size of the light source relative to the subject.
Choosing a Softbox Size (Softbox Scale Rules)
The larger the light source relative to your subject, the softer the light. For headshots, a medium rectangular softbox (24–36 inches) gives flattering wrap. For full-length portraits, bump up the size to keep softness consistent across the body. Distance matters: move the softbox closer to increase softness and brightness.
Using Reflectors Effectively (Silver vs White vs Gold)
White reflectors provide soft, neutral fill; silver adds contrast and stronger specular highlights; gold warms skin tones (great for golden hour-like effects). Place reflectors opposite the key light and adjust angle for subtlety — the goal is controlled fill, not a flash of light in the eye.
Metering, Exposure & Camera Settings
Light control goes hand-in-hand with exposure control. Learn to expose for skin tones and use the histogram. Spot meter on the face when exact skin exposure matters, or use semi-auto modes when speed is necessary. For predictable results in controlled sessions, manual mode is king. TTL is useful for fast-moving or run-and-gun shoots, but it can be less consistent in mixed lighting.
Manual Mode vs TTL — When to Use Each
Use manual mode in studio and controlled environments to lock in lighting ratios and exposure. Use TTL for event-style portraiture, where speed and adaptability matter. When mixing ambient and flash, manual flash with manual camera settings gives the tightest control.
Metering for Skin Tones & Reading the Histogram
Aim for skin highlights to land safely on the histogram without clipping. If the highlights clip, you’ll lose texture (especially on bright foreheads or cheekbones). Slight underexposure preserves highlight detail; you can recover shadows in post if needed. Practice reading the histogram quickly so you can adapt on the fly.
Color Temperature & White Balance
Color sets mood. Daylight sits around 5000–6500K (neutral to slightly cool); tungsten is warmer (~3200K). Your camera’s auto white balance can be fine, but for accurate skin color, use a preset or custom Kelvin and test with a gray card. When using flash + ambient, decide which you want to dominate and gel the flash or adjust white balance accordingly.
Balancing Ambient and Flash
To preserve the feel of ambient light (e.g., golden hour), dial your flash down and expose for the ambient while using flash as subtle fill. Conversely, if you want the flash to be the primary look, expose for the flash and underexpose the background slightly for separation.
Creative Lighting Techniques
Once you master basics, play. Use a rim light to separate subject from background, add a hair light for shine, or throw gels to create colored accents. These creative touches are the difference between competent portraits and memorable portraits that tell a story.
Rim & Hair Light for Separation
Place a small light behind and slightly above the subject aimed at the hair or shoulder edge. It creates a thin highlight that separates subject from background — essential when backgrounds are busy or dark. Keep the rim subtle; it should whisper, not scream.
Gels & Mixed-Color Lighting
Gels let you paint with light. Use a cool gel on the background and warm on the subject to create depth. Or tint shadows with color to change mood — magenta for stylized fashion, blue for cinematic coolness. When using gels, white balance for the main skin tone, then fine-tune in post.
Practical Tips for Studio and Outdoor Shoots
Good lighting is technical, but great lighting includes people skills. Talk to your subject, give simple directions, and use lights to flatter not to intimidate. Small adjustments to head angle or chin position can change how light models features dramatically.
Communicating with Your Subject
Ask your subject to move a hair’s breadth — small changes yield big differences in shadow and catchlights. Use positive, visual directions: “Tilt your chin down a touch,” or “Look toward the light like you’re remembering something warm.” The more comfortable they are, the better the light reads on skin and expression.
Posing and Light Placement
Light sculpts; pose to take advantage of it. For a strong jawline, raise the chin slightly under butterfly lighting. For softer looks, keep light closer and slightly higher. Think of the light as a sculptor’s tool: place it to reveal the planes you want to emphasize.
Common Lighting Mistakes & How to Fix Them
- Harsh shadows across the nose or eyes: soften the source or move the light further off-axis.
- Blown highlights on forehead or cheek: reduce light power or move modifier further away.
- Flat lighting that removes shape: add a rim or side light to bring depth.
- Mismatched color casts: check white balance and gels; use a gray card when possible.
Post-processing Tips for Lighting Improvements
Editing can enhance good lighting and rescue small errors. Use local dodge and burn to sculpt highlights and shadows, adjust tone curves to recover contrast, and use selective color tools to refine skin tones. But don’t rely on editing to fix fundamentally bad lighting — aim to get it right in-camera first.
Conclusion
Lighting is both the foundation and the flourishes of portrait photography. The more you practice reading light — where it’s coming from, how hard or soft it is, and what color it carries — the faster you’ll be able to translate ideas into images. Start simple: pick one classic setup (loop or Rembrandt), learn it well, and then experiment with modifiers and creative techniques. With time, you’ll internalize the language of light so your camera becomes an extension of your vision. Keep shooting, keep adjusting, and let light tell your subject’s story.
FAQs
Q1: What is the easiest lighting setup for beginners in portrait photography?
A1: Loop lighting is a forgiving and versatile starting point. It sculpts the face without creating extreme contrast and works well for many face shapes. Use a single softbox or window as your key and a reflector for gentle fill.
Q2: How do I get soft skin tones without losing detail?
A2: Use a larger soft light source close to the subject, lower contrast slightly in-camera (fill or reflector), and avoid overexposing highlights. In post, subtle clarity and localized skin retouching preserve detail.
Q3: Should I use natural light or flash for portraits?
A3: Use both — natural light for a soft, authentic feel; flash for control and consistency. Many pro photographers blend them: natural as the mood-setting key, flash as fill or hair light.
Q4: What color temperature should I set for portrait shoots?
A4: Daylight around 5000–5600K is a safe starting point. If shooting under tungsten, use 3200K or gel your flash to match. When in doubt, shoot a gray card and set a custom white balance.
Q5: How can I create separation between subject and background with light?
A5: Add a rim/hair light behind the subject, underexpose the background slightly, or use a background light with a different color or intensity than the key. Grids and snoots help control spill and create isolation.


